Project 2 - Computational Design Tool
This is a 9 week long final project for the course with 4 milestones. This document is subject to change with each milestone, e.g., offering more details or clarifications or iteration based on class feedback.
For the final project in CST 181DT: computational design tools, you and your group will be creating—you guessed it—a computational design tool. You will choose groups of 3-41 and also a weekly meeting time for at least an hour that everyone can regularly commit to during the duration of this project.
Throughout the way, you will be conducting need finding user interviews for your tool, developing prototypes of various fidelity, user testing your tool with your peers in and outside of class, and writing up your results and motivation in the format of a short “late breaking work” research paper. The learning goals of this project are to gain experience in engineering interactive software and to use the human-centered design process to motivate and evaluate software design decisions.
What counts as a computational design tool?
A computational design tool is a tool that uses computation to allow users to interactively create something. The computational aspects may be simple or complex, the actual act of making may be simple or complex, but the results, or the impact on the process, should have the potential to be meaningful and diverse.
For instance, in increasing implementation difficulty:
- A map where users may place pins and enter text memories of their queer experiences (i.e., Queering the Map). The computational and making aspects are relatively simple (place pins and enter text on a map), but because this is a collaborative tool connected to personal narratives, the resulting map full of pins is diverse and meaningful.
- A drawing program that fades out your past strokes over time. You can implement this relatively easily in Processing by keeping track of the strokes, attaching a timer to each stroke, and removing it from the canvas when the time has expired. But because strokes disappear and disrupt the normal drawing process, this tool has the potential to change how users relate to drawing and how they choose to draw.
- A tool to create black out poetry (i.e., poetry made by crossing out selective words) from Twitter. Users can search a Twitter hashtag, the tool can bring up some subset of tweets and guide the users in rearranging them and blacking out words. This tool has very wide walls and relatively high user agency: the tool makes few decisions, while users are making more of the decisions.
- An Inkscape extension that, if users highlight and select their laser cut joints, will keep them all at a user entered width of material no matter how they scale or modify the rest of the drawing. (Kind of like Lillicon but specifically for keeping your joints a consistent size.) Requires some effort to figure out how to actually make this possible, a relatively simple interaction, but wide walls: it could take any input. And certainly useful!
- A social media app like BeReal where users are asked at a random time of day to post, but instead of an image it’s a 30 second audio clip. The computational aspects are complex (building a social media platform is a lot of work), the act of making is relatively simple (just record your microphone), but again the results could be interesting and diverse. (You can imagine users can also play back all of their 30 second clips compiled together for a 3.5 minute weekly recap.)
Here are some examples that would not be considered a “design tool” for this project:
- A direct manipulation UI that lets users make Gmail filters through selecting emails and folders, removing the need to code/know how to type the syntax for Gmail filters. (Too narrow walls, not diverse range of results - how is it helping with “design”?)
- Something like Fishdraw that generates artifacts for the user without a lot of input (too automated/users lack interactivity or agency in the design process in that the only interaction is that they press a button).
What are the constraints of this project?
- The tool should be a novel idea. We are not conducting research so it does not need to produce “generalizable” knowledge, but you should not be building something that already exists.
- The tool needs to have a computational solution, i.e., you should be writing code somewhere.
- The user needs to have a meaningful interaction with the tool that results in diverse, user-generated output. (Basically, aim for wide walls.)
- The tool should be codeable in 4-6 weeks.
What are principles we should follow?
- Clarify your users, domain of use, the problem that you’re tackling, and how you’re computationally solve that problem. It’s OK if the problem is something like, “there is no existing tool that does what our tool does”, or “doing what our tool does is hard with existing methods, so we made it easier”.
- Think of inputs and outputs. What is the possible input space of your tool? If your tool was a function, what does it do? What is the possible output space?
- Iterate, iterate, iterate. Iteration is great! Your grade will never be penalized for iterating or pivoting. If your final tool is exactly the same as your initial brainstorm, I will personal be very surprised.
Final deliverables
- The tool itself, to be presented by your group and used by your classmates in a “tool expo” on the last day of class (4/30)
- A short (4 page max) written paper for your tool, in the SIGCHI Latex paper template, which, in addition to an abstract/conclusion, includes (1) an introduction, (2) a methods section, (3) an evaluation, and (4) a short future work section. (Basically what you would see in a standard CHI “late breaking work” besides a related work section.)
- A video demonstration of your tool which addresses and demonstrates its floor, ceiling, and walls as well as includes at least 2 intro sentences about the larger motivation, context, or problem you’re addressing with your tool
- A PDF documentation of your design process. Since the process is so long, this should be a living document that you add to after each team meeting. This differs from the paper in that the paper reports final decisions while the documentation should explain pivots, prototypes, and design rationale. Attach your weekly team meeting notes as an appendix.
Timeline
This is a 9 week long project with 4 milestones. Here’s a rough timeline to keep you on track.
- By class 7A: Milestone 1: Ideas. Form groups in class around pitching ideas.
- By class 8A: Milestone 2: Needfinding and intro. Conduct needfinding interviews and write up the motivation of your project using the argument formats of a research paper. At this point, you should feel more confident in your project idea.
- Class 10A: We will be making and testing a low fidelity paper prototype of the tool in class together.
- By class 11A: Milestone 3: First Wizard of Oz prototype. A Wizard of Oz prototype is a higher fidelity prototype that gives an accurate impression of the tool interaction, but is not implemented (e.g., you can be the computer–the Wizard of Oz). We will be conducting an evaluation of your tool prototype in class for feedback and iteration.
- By class 12A: Milestone 4: System diagram. At this point you should have a good idea of how to implement your tool. Get engineering!
- Final presentations class 16A (last class of the semester).
Milestone 1: Ideas
Due 2:30pm Tues, Feb 27.
Please submit 3 potential project ideas on this Google form. Timely submission of this assignment counts towards your participation grade in class.
Milestone 2: Needfinding and introduction
Needfinding part due 2:30pm Tues, March 5.
Introduction part due 11:59pm Fri, March 8.
Now that you have your groups, let’s focus on defining and refining your project idea. This milestone has two separate components which should be done in order: (1) Developing a needfinding interview guide as a group, scheduling and conducting an individual needfinding interview, and coming together as a group to talk about and synthesize the findings. This should result in forming design goals for the tool. (2) Writing a motivating introduction about the project in Latex (using Overleaf).
The learning goals of this milestone are to (1) develop experience in conducting good needfinding interviews, (2) develop familiarity using Latex templates of academic short papers, and (3) being able to construct a written argument motivating your tool.
Needfinding
Needfinding is an important part of the design process. It will help you both focus your idea and generate possibilities for iteration and innovation. Is your tool addressing a salient problem in its domain? Are there other user needs going unmet that you might additionally, or instead address? How can we discover what users need and want in building a useful (or entertaining, or mischievous–whatever your end goal is) tool? For this milestone, you will be conducting story interviews to generate design insights and goals for your tool. To get to these design goals, first you need to understand what the user needs are in the context of using your tool.
Creating a good interview guide is very dependent on the context of the project, so that’s why we have Project OH in class on Thursday (2/29). The instructor will go to each group and offer specific guidance and feedback based on their tool.
First, develop an interview guide as a team. A semi-structured interview means while you have a general interview guide, it is OK to stray away from the guide and ask spontaneous follow up questions reacting to what your interview participant has said. Some pointers:
- Ask a specific question (“tell me about a time when you…”) to start things off. It may be tempting to ask a more general question to break the ice, but that may bias the participant at talking at a high level of abstraction for the rest of the interview.
- Get participants to be as specific as possible. (Hence why we ask them for stories!)
- Avoid asking yes/no questions. Ask open-ended questions.
- Ask about moments of breakdown (when something did not go as expected), and how participants recovered from that breakdown.
- What will help you write an introduction to motivate your project? What questions or unknowns do you have around your idea, or around how your tool should be designed?
- Remember, first talk about the problem you are trying to address in general. Near the end of the interview it is OK to reveal your tool idea and solicit opinions.
- However, do not pitch your initial tool idea and then ask “would you use it?” Participants may feel biased to answer yes to avoid an awkward social situation. Instead focus on asking open-ended questions; you can ask them, for instance, specific instances of how they would potentially incorporate this tool into their lives.
- For a 30 minute interview, ~10 interview questions should be sufficient. They should be ordered in the order you will ask them. You may also choose to mark questions as skippable or not (do you want an answer to this question for everyone, or is it better to get the juicy details of some tangent the participant went on?).
- After the interview, before leaving, immediately jot down 3 or so surprising impressions or critical points.
Once everyone agrees on the questions, it’s time to ask them!
Resources
Some additional optional readings that may help you in conducting needfinding:
Second, everyone should conduct their own ~30 minute long semi-structured interview or contextual inquiry. Your person can be a fellow student, but ideally they should be part of the target user group of your tool. I would recommend scheduling them even before you finalize the interview guide so you can lock in a 30 minute timeslot to conduct the needfinding. Semi-structured interviews may also be conducted in person or online.
Every team member should turn in a page of takeaways/notes from the interview. Sometimes, or for some individuals, it is hard to carry a conversation and focus on jotting notes at the same time. If this is the case, I highly recommend asking the person for permission to audio record the interview. Conduct the interview with your full attention on getting data and talking with the person, and then listen to the recording afterward to create your note sheet and takeaways. A suggested format of the notesheet is Q/A: copy/paste your questions from your interview guide, and then write the interviewee’s answers after each question. It does not have to be verbatim, but it should capture the main points of what they said.
This notesheet should include:
- who conducted the interview
- who was interviewed and their relationship to the interviewer
- where the interview was conducted (dorm, Zoom, library, etc.)
- the 3 or so first impressions or critical points written down immediately after the interview
- the general summary or Q/A notes from the interview.
The notes should be written in enough detail that your groupmates can understand the interview takeaways.
Finally, the team should get together and talk about and synthesize their findings and create design goals.
The team should share and read everyone else’s interview notes and write a summary paragraph of results. What were common themes throughout all the interviews? What were points of tension or disagreement? What are the most salient needs in your problem or domain area?
Finally, write a bulleted list of the 3 main design goals you want your tool to have a result of these interview findings. Design goals should be borne out of your design decisions in scoping the project and user. How can you address the most salient needs you found from your interviews? What do you prioritize in the tool design, and what do you prioritize it over? What kind of results do you wish to achieve? Are you targeting expressiveness, efficiency, iteration, a new mental model, or something else?
Resources
Some academic papers that employ this method of needfinding and synthesizing design goals from “formative studies” (or existing literature) that you could read for reference and/or inspiration include:
- Draco - Section “Design Goals”
- Editing Spatial Layouts through Tactile Templates for People with Visual Impairments - Section 3 “Design Imperatives” (this was my first paper in my PhD)
- A Layered Authoring Tool for Stylized 3D animations - Section 3.4 “Design Goals”
- Color Field: Developing Professional Vision by Visualizing the Effects of Color Filters - Section 3.2 “Design Objectives”
- Metaphoria: An Algorithmic Companion for Metaphor Creation - Section 3 “Design Goals”
Short paper introduction
As part of your final deliverable, we will be writing parts of a short, 4 page paper in the SIGCHI research paper style describing various aspects of your tool. For this assignment, you should write a draft of the introduction section.
First, one person should make a copy of the Overleaf template and invite all other group members to collaborate via email. It’s important you keep this link since you will be adding to this paper throughout the semester.
If you’re not already familiar, see how to make tables (\begin{table}) and figures (\begin{figure}) in the template, as these will come in handy later.
Work together to edit the template to contain only your introduction to your tool project. As we will see in lecture on Thursday, good introductions are like a funnel: we start with broad context, then introduce our problem, then introduce our solution.
I would recommend first working on establishing a 6 topic sentence outline, and then fleshing the points in the outline into paragraphs. I am happy to take a look at the outline during OH. Let’s run through an example looking at a paper I wrote about a tool that automates the rigging process for character illustrations. The outline should address these 6 points:
- Context: What is the domain you’re working in? Why should people care about this domain? If relevant, how has it evolved over time? Example topic sentence(s):
Illustrated 2D characters are prevalent across many visual applications, including storytelling, advertising, animation, and games. Recently, “mix-and-match” 2D character creation tools have emerged that make character design more accessible to a broader range of users. With mix-and-match tools, users can quickly explore a range of character designs by selecting different combinations of body and accessory layers.
- Problem: What’s the problem you’re solving? Make the reader feel the urgency of the problem, so that by the end of the paragraph they care a lot that someone finds a solution. Example topic sentence(s):
However, this convenience comes at the cost of flexibility and expressiveness. While there are typically dozens of accessories to choose from, there are many fewer body shape and pose variations (often just one).
- Set up the bit: This paragraph usually answers the question, “Why isn’t this problem solved yet?” by setting up the bit that you’re going to flip. The topic sentence typically summarizes existing approaches to solving the problem by articulating the bit that they share, and points out why those approaches and the bit more broadly hasn’t been able to solve the problem. Example topic sentence(s):
For a given application, both end-users and the original character designers may want to modify a character’s body shape or pose away from the predefined options. Currently, users have to manually edit or redraw all the accessory layers to fit the edited body.
- Flip the bit: Here you introduce your insight (i.e., your tool design) by flipping the bit. The topic sentence of this paragraph is the thesis statement for the entire paper. It should lay out the big idea that you’ll be pursuing. Spend this paragraph explaining your insight clearly, why it flips the bit that you set up, and what the implications of flipping that bit will be for the problem at hand. For the purposes of this assignment, it’s fine to assume that your bit flip will work out — we all know that research is iterative and projects will evolve. Example topic sentence:
The goal of our work is to make mix-and-match character creation tools more flexible by allowing users to modify a character’s body layers while automatically adapting the accessory layers to fit.
- Instantiate that bit flip in a solution: At this point, the reader understands the idea that you’re proposing, but it’s still very high level. In this paragraph, map that idea onto a concrete instantiation. This is where you introduce the tool you’ve built, and how it instantiates that insight. Example topic sentence:
Our approach is to automatically generate a rig, a set of constraints that specify how changes in the body layers should transfer to the accessory layers, for each accessory layer.
- Evaluate the solution: We haven’t discussed evaluation yet in the class, but a good introduction summarizes the evaluation that you performed to demonstrate that flipping the bit has the effects that you suspect. For the purposes of this assignment, ask yourself: how would you prove to a critical reader that flipping the bit has the effect you promised in solving the problem? We expect you to articulate what you will be manipulating and measuring, but we don’t require any actual results right now and we won’t hold you to this evaluation strategy — especially since sometimes your evaluation strategy evolves as your project evolves. Example topic sentence(s):
We use our approach to automatically rig a wide range of character accessories derived from existing mix-and-match data sets and show the results for various modifications to the shape and pose of the character. In addition, we demonstrate two applications where our rigs enable continuous edits that propagate to all the accessories: an interactive character customization interface where users modify various body shape parameters, and animations that change the body shape and pose over time.
From this outline of topic sentences, fill in the rest of the paragraphs. It’s fine to combine short paragraphs together, but the general problem-solution structure should be there.
Your introduction should be roughly 500-800 words long. You are welcome to include figures and citations in your introduction if they support your claims, but you are definitely not expected or required to.
Deliverables
- 2 PDFs should be submitted to Canvas:
- Needfinding PDF containing (1) the synthesis of the needfinding interviews and 3 design goals, (2) each individual person’s interview notes, and (3) the shared interview guide (due Tues March 5 2:30pm).
- Intro PDF: the PDF downloaded from Overleaf containing the introduction in the SIGCHI latex template (due Fri March 8 11:59pm).
Milestone 3: Wizard-of-Oz Prototypes
Due 2:30pm Tues, March 26.
At this point you’ve made a scenario paper prototype of the most critical interaction of your tool. Hopefully you have iterated on your designs and ideas a bit based off of initial feedback and in-class user tests. In this milestone, we’ll flesh out the full tool in Figma as well as plan metrics to gather during our in clas evaluation on Tues, March 26. Your Wizard-of-Oz prototype should focus on breadth over depth (so show the range of all possible interactions, but it’s OK to have canned user inputs).
The learning goals of this milestone are to engage in the design process to have a working, high-fidelity WoZ prototype to test with your classmates.
Step 1: Breadth wireflow
While you now have a better idea of how one interaction works, it’s time to flesh out the full interaction for your tool. Before diving into Figma, I recommend discussing and agreeing as a group on flow-based wireframes (a wireflow) for your entire tool. Plan out how your tool works. What is the screen users see when they first open the tool? What are all the tasks you want to support, and how do users transition from one screen to another?

Put the low fidelity wireflow (you can do a paper sketch) and/or discussion notes in your ongoing design documentation. It is recommended you finish this step before class on Thursday.
Step 2: Wizard-of-Oz prototype on Figma
First, if you haven’t already, sign up for a free educational account on Figma at https://www.figma.com/education/. One person should create the project workspace and invite all other memberes of your team to collaborate on editing the file.
Create the screens in your wireflow. For this assignment, it is recommended to make the frames their actual display size (e.g., desktop, tablet, or mobile screen sized based on your hardware). Remember we are going for a breadth prototype. This means:
- From the main home screen, all the buttons/navigation options should work
- However, when we click on a button, you can have “canned” user input (e.g., you only need to prototype out one scenario or one selected option per interaction)
On the right sidebar, Figma has a “Design” tab and a “Prototype” tab. Once you’re done with the designs, connect the screens together switching to “Prototype” mode. You can then click the blue + icons by your components and choose interactions from the sidebar drop down, such as connecting it to a different frame on click. To preview these newly formed interactions, press the play button on the upper right to go to Wizard-of-Oz prototype mode.
This prototype should be higher fidelity as it is the bridge between your design ideas and implementation. It should be specific and visual enough that an engineer could implement the UI from the Figma file alone.
As a warning, going from low to high fidelity prototyping takes a lot of time. Please start early; I would expect this Figma prototype to take around 10-20 hours total per group (split, hopefully, evenly between group members).
Resources
- Figma is a powerful design and prototyping tool with many built in resources and guides, such as this one on prototyping.
- Here’s an intro Figma Workshop by one of my undergraduate collaborators (press play to see the slides) which goes over app basics. In addition, he has taught an entire course on Figma if you want to learn more.
- Please don’t hesitate to stop by OH or shoot me a quick Slack message if you run into any Figma troubles.
Deliverables
- On Canvas, a link to your Figma prototype.
Rubric
While this assignment, like all other checkpoints, does not affect your final grade, I will be giving you feedback on these areas:
- Visual design: does the tool look “modern” and professional? How is the spacing, colors, iconography, and typography?
- Interaction design: can users easily accomplish their goals? Does the flow make sense? Is the tool discoverable? Are the controls visible and accurately mapped?
- Degree of agency: Does the tool have the potential for wide walls and diverse user inputs? (Note that the breadth based WoZ prototype does not actually have to accomodate wide walls–and in fact shouldn’t, as you should used predetermined responses–but the design itself should speak to user creative freedom.)
Milestone 4: System Diagram
Due 2:30pm Tues, Apr 2.
The learning goals of this assignment are to prepare you for building out your tool for the rest of the semester. As such, this is a planning/reflection heavy assignment: you will reflect on what to iterate from your Figma prototype, you will plan out some libraries and function docstrings for your tool, and you will create a sample implementation timeline. I estimate this assignment will take roughly 10 hours total per group.
Step 0: Iteration
What did you learn from your in class WoZ evaluation and/or instructor feedback? What worked well, and what was confusing? Did you observe anything that was surprising?
In your ongoing design doc, write at least 3 main lessons learned as well as how you will change them going forward.
Step 1: State diagram
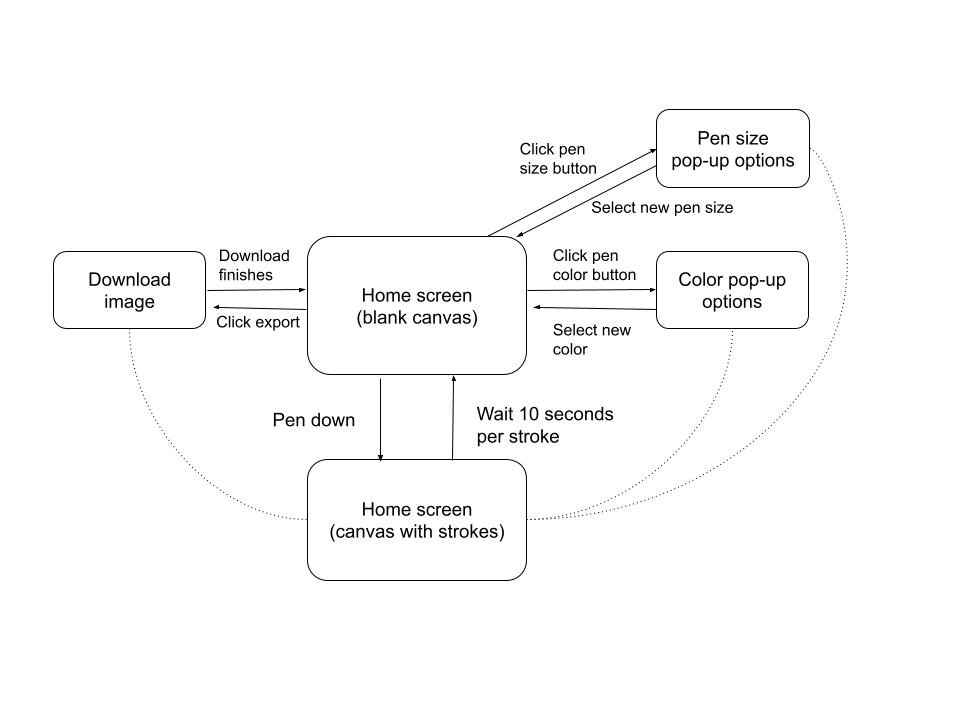
First, model your tool as a finite state machine with transitions. This can come pretty directly from your Figma, with separate screens or pop-ups each being a state, and button presses acting as transitions. You can make your system diagram in Figma, or Google Draw, or whatever tool feels best.
The FSM above is an example diagram for a very simple drawing tool that fades your strokes over time (10 seconds). The drawing tool also has the option to change your pen color and size. The dotted lines in the diagram represent the same transition to the state from the canvas with strokes state as the blank canvas state—basically, that users can download their image or change pen options in either state (to save visual clutter).
Paste this FSM diagram into a Google Doc, which you’ll add on to by answering the questions in step 2.
Step 2: Libraries & functions
Now that you have a high level view of your tool’s implementation, it’s time to figure out the code. In the Google Doc, answer these questions:
- What technologies and libraries are you using? (See the system design notes for suggested libraries, all in JS). What programming language are you using, and why?
- Do you want to use the MVC model, or something else? (This may be answered for you depending on the development environment and libraries you choose.)
- Do you want to have classes or any kind of object oriented approach? If so, what would the main classes be?
- What kinds of data structures will you be using, and to store what?
- How do you plan on storing the state of your tool, and transitioning to different states? E.g., will you use JS callback functions? Does the library you’re using have some kind of state management system for you?
Next, write a list of function docstrings (inputs, outputs, and a brief sentence of what the function does) for your tool. Functions map nicely (but not necessarily perfectly) to the transitions in your FSM. Focus more on back-end functionality functions rather than front-end display functions. Let’s say we’re building the example tool above in P5.js. A few functions would be:
function penDown(color, strokeWeight) {
  /*
  draw a stroke with appropriate color and strokeWeight, and
  create a timer object and add it to the queue of timers.

  will go into the draw() loop in p5js.

  params: color, strokeWeight
  return: none
  FSM transition: "pen down"
  */
}

function decrementTimers(timers) {
  /*
  checks if framecount is divisible by 60 (a second has passed)
  and decrements each timer in the queue.

  will go into the draw() loop in p5js.

  params: timers (queue of timers)
  return: timers
  FSM state: canvas with strokes
  */
}


function timerExpired(timer, stroke) {
  /*
  removes associated stroke with expired timer.

  will go into the draw() loop in p5js.

  params: timers, stroke
  return: none
  FSM transition: "wait 10 seconds per stroke"
  */

function selectColor() {
  /*
  uses p5js's built in createColorPicker() in setup() to create
  a color picker; updates the color in draw()

  params: none
  return: color value
  FSM transition: "click pen color button"
  */
}
The more detailed you are in your state machine and docstrings, the easier your tool will be to implement. Use this assignment as an opportunity to ask and answer questions and unknowns.
We’ll have in class time on Thurs, March 28 to go over this.
Step 3: Timeline
Part of engineering a large system is setting shorter deadlines and goals along the way, as well as effectively divvying the work. Make a table in the Google doc as follows:
| Task | Person(s) | Due |
|---|---|---|
And fill it out. The first task should be setting up the libraries and Github repo and making sure everyone can run the code on their personal computers. (I would recommend you get together as a group and do it together synchronously, by April 4th.) Other tasks include implementing the functions you listed above, iterating from in-class evaluations, and building front-end UI.
Some milestones we have that may help you plan your timeline:
- April 11 (1.5 weeks after this milestone is due) is our next in-class evaluation of your tool’s MVP (minimum viable product). Basically, the core functionality of your tool should be built out, similar to what you identified for your low fidelity scenario paper prototype. Except this time it’s a “depth” prototype since your tool should be able to accept diverse user inputs for a single task.
- April 25 (2 weeks after the MVP evaluation) is our final in class evaluation. All of the functionality of your tool should be completed by then, minus a few edge cases or UI tweaks.
This is the last milestone before your final project is due. Use this chance to plan well so you can have a successful month of development!
(As a preview of what’s left in CS181DT: You have 3 more sketchnotes due in this class, and 3 more personal making assignments (though these will be much shorter than the personal making assignments that started the course, around ~3 hours each). In-class time April 18th will be half project work time and April 23rd will be entirely project work time.)
Deliverables
- On Canvas, a link to or PDF of your ongoing design documentation showing the iteration you plan to do after what your group learned from the WoZ evaluation.
- On Canvas, a PDF containing your system diagram, answers to part 2’s questions, functions, timeline, and (optionally) any questions or concerns you have around technical feasibility.
Final Grading & Submission
Rubric
- 10% completed all the milestones on time
- 50% tool itself
- 40% communicating the tool
- 25% written 4 page paper
- 5% tool expo presentation
- 5% PDF documentation
- 5% video
Please also fill out the self and peer assessment form.
Final deliverables
The tool itself (50%)
Grading criteria include:
- Tool has polished interaction and visual design (e.g., your classmate wouldn’t point out a glaring error when using it)
- Tool accomplishes a range of tasks and handles diverse user inputs (wide walls)
- Tool attempts to meet group’s stated design goals
- Tool followed human-centered design cycle (e.g., group implemented feedback on various prototypes and iterated)
- Tool is accessible for the instructor to run on their computer and use (e.g., via visiting a web URL or having clear instructions on how to run the tool on localhost)
Make sure to include a link to the tool’s website or Github repo. If you choose to have a repo, and the repo is not public and you would like to keep it private, add my account (radiolarian) as a collaborator. But really the best solution, in terms of software development standards, is to remove your API keys and have a public repo :) Make sure your Github repo has a valid README that describes how to install and run the tool locally on your computer, including dependencies/libraries that need to be installed if they are not included already with the repo (e.g., aren’t covered by NPM or aren’t static .js files that already exist in the repo).
Written “research style” paper (25%)
Go back and edit your introduction in the SIGCHI Latex paper template. This paper (4 page maximum) should include:
- a short abstract (max 200 words)
- an introduction (~1 page)
- a methods/tool section (~1.5 pages), including figures showing your tool
- an evaluation section (0.5 pages)
- a short limitations/future work section (2 paragraphs)
- a short conclusion (1 paragraph)
For guidance on how to write a good short HCI paper, check out Catchy Titles Are Good: But Avoid Being Cute by Wobbrock. Also feel free to reference many of the papers we’ve read in class!
Abstract
An abstract is a summary of your work that focuses on two things: describing what was done and describing the results. Be specific about key findings. Generally, the sentence structure of an abstraction is 1. motivation/problem 2. your solution 3. highlights of your solution 4. findings and implications of your solution.
Methods/tool section
This section answers the question, “what was done”? You should include:
- A paragraph describing your formative studies and how they lead to your design goals
- A paragraph summarizing your different design iterations to get to the final tool
- A paragraph that is a “tool walkthrough” describing how a potential user would use the tool and describing its features
- A pargraph describing how the tool was implemented, e.g., what libraries did you use, any stand out development insights or challenges
- At least 1 figure of your tool, ideally showing multiple states
- Optionally, figures of earlier designs (like your wireflow or Figma) to be referenced during the design iteration paragraph
Evaluation
This section answers the question, “now that the tool exists, so what?” You should write about how you met (or failed to meet–failure is OK!) your design goals. Include:
- A paragraph explaining your evaluation procedure (e.g., how many participants, what metrics did you collect, what tasks you had the participants do)
- A paragraph providing evidence to back up meeting your design goals. These could be qualitative (user quotes) or quantitative (small tracking measurements or likert scales) data. No need to do statistical analysis, painting a general picture is fine–but be sure to not make grand claims you cannot back up.
Limitations / Future work
This section should include two paragraphs:
- A paragraph on limitations of your tool. We can’t solve every problem in an 8 week class project. What didn’t you get to? What didn’t work as well as you had thought?
- A paragraph on future work. If you had all the time in the world, what would you like to add?
Conclusion
The conclusion is an abstract inverted: I personally like flipping the sentence order of my abstract and ending the conclusion with a big “implications” sentence. What kind of future do you hope to see through designing and developing this tool?
Optional extra credit: Round out your paper with a related works section for a potential of +3% more points for this assignment section. If you would like to pursue this option, please contact the instructor and stop by office hourse.
In-class presentation (5%)
You will have an 8 min presentation with 3 minutes of Q&A on our last class (Tues, April 30). Everyone is expected to attend unless you are a HMC student who has previously told me about clinic week. You should use presentation slides. The presentation should address (with suggested time allocations):
- Motivation for your tool, your needfinding results, your design goals (2 min)
- A brief walkthrough of your design process and iteration (1.5 min)
- An interactive demo of your object (you may ask the class audience for inputs) (3.5 min)
- Your evaluation results (0.5 min)
- Any limitations or future work (0.5 min)
Unlike the first project, you do not need to play your video during your presentation :)
Grading criteria include:
- Is the presentation clear and concise? Does it paint not only a good picture of the tool’s process, but also showcase the depth and diversity of the tool itself?
- Do the presentation slides address the points above?
- Did the presentation stay under 8 minutes?
- Did the team participate equally in the presentation, answer questions well, and ask thoughtful questions to others?
PDF design documentation (5%)
You’ve been adding to this all semester. Grading criteria include:
- Inclusion of design goals, in-class evaluation notes, low fidelity wireframes, other prototypes, etc.
- Inclusion of design decision rationale for any pivots made in your design or development.
Extra credit opportunity: clean up your design documentation (at the level of this could be a PDF for your design portfolio, put some work into the visual design and presentation and communication of the information, rather than sproadic Google Doc notes) for an additional +1% point in this category. As an example of what a “clean” design would look like, you can see my write up for Adshirt.
Video (5%)
This should be a short (~3 minute) video that standalone explains your tool. Imagine the video as the first thing people see on your portfolio piece for the tool. The video should
- Open with at least 2 sentences around the motivation and context for the problem your tool solves
- Talk briefly about your design goals and design process/decisions/iteration
- Shows a narrated screen recording of your tool working, to demonstrate its floor, ceiling, and walls. Make sure you show every feature!
- Talk briefly about how you evaluated the tool and your results
You can largely reuse your presentation materials for the video! Grading criteria is the inclusion of the points above, and also how “polished” the video is (e.g., good audio balancing, editing, etc.)
Everyone in the group should get the same grade, but these grades can potentially vary ~±5% based off of peer and self assessment. Link to form: https://forms.gle/qZ66a1QqDh9rs6bt6
-
Students may work alone but it is highly discouraged since this project’s workload is scoped to be done in a group. If this is something that still appeals to you, please email the instructor a few paragraphs justifying why you want to work alone. ↩