Project 1 - Protest Design
This is a 3 week long project with one milestone. Please read the full webpage carefully.
As we read, design fiction can be a powerful tool for telling stories about the futures we want to envision and live in. Well designed objects of design fiction help us figure out what the right questions are to ask, rather than provide answers for them. And while there is no unified aesthetic of protest, disobedient objects, when placed in the right contexts, can exert their own kind of counter power. In this project, your goal is to design an interactive object for protest.
The specific site and context of protest is up to your group. You are free to choose any protest or movement, or create your own. It should be an issue of current concern, from vast and global, to immediate and local. Your object should, in the context of this protest or cultural movement for social change, get users thinking when interacting with it. What kind of message do you want to send? And how can you design an object and experience that communicates this message? Your object should be a provocation: it should help people who encounter it speculate about future possibilities, or at least critique the present.
The first step is to get together as a group to conduct a brainstorming session. Start by listing out causes you are passionate about, questions these causes raise, and ways you can capture these questions–or ways of working through and thinking about these questions–in an object. Take note of the activities, images, and people within current protests. Who is your envisioned user of your object? Protests can engage many different senses: sounds, visual elements, clothing, slogans, tweets…these are all potential sites for design. Your object should be motivated by the cultural activities of the protest and provide a new opportunity within that landscape.
Next, create a novel interactive object for this protest. You may take an existing object and appropriate, re-imagine, or redesign it with some interactivity. You may make an entirely new object. You may use the fabrication techniques we discuss in class (e.g., laser cutting, cardboard, 3D printing) to help you with any part of the physical form making. Interactivity does not necessarily have to mean having sensors and electronic components (though it could), but rather the object is designed in a way that a human who interacts with it will leave with something to take away. The important things are
- Users interact with the object in some non-trivial way (e.g., not just looking at it). You do not need to automate the object interactions: a member of the team can hit switches, hand out sheets of paper, say a particular phrase, etc., to users who encounter the object.
- The object has some 3D physical presence (e.g., most of it can be a small interactive website, but there needs to be a physical object tied in somehow)
Lastly, part of your final deliverable is documenting your design process. Make sure to take lots of photos and/or videos while you’re working!
Timeline
This is a 3 week long project with one milestone. Here’s a rough timeline to keep you on track.
- By class 3B: Milestone 1 (storyboards of envisioned interactions).
- By class 4B: First iteration of object. This class is project work time so I am available to help you with any questions, and provide feedback for iteration and refinement (and of course my OH are always open).
- By class 5A: The final object shown with an in-class presentation and in-situ video. By the end of the day, all other documentation and a peer feedback form.
Milestone 1
By class 3B (Thu Feb 1), I expect your group to have undergone a brainstorming session and to have created a storyboard envisioning how users will interact with your object.
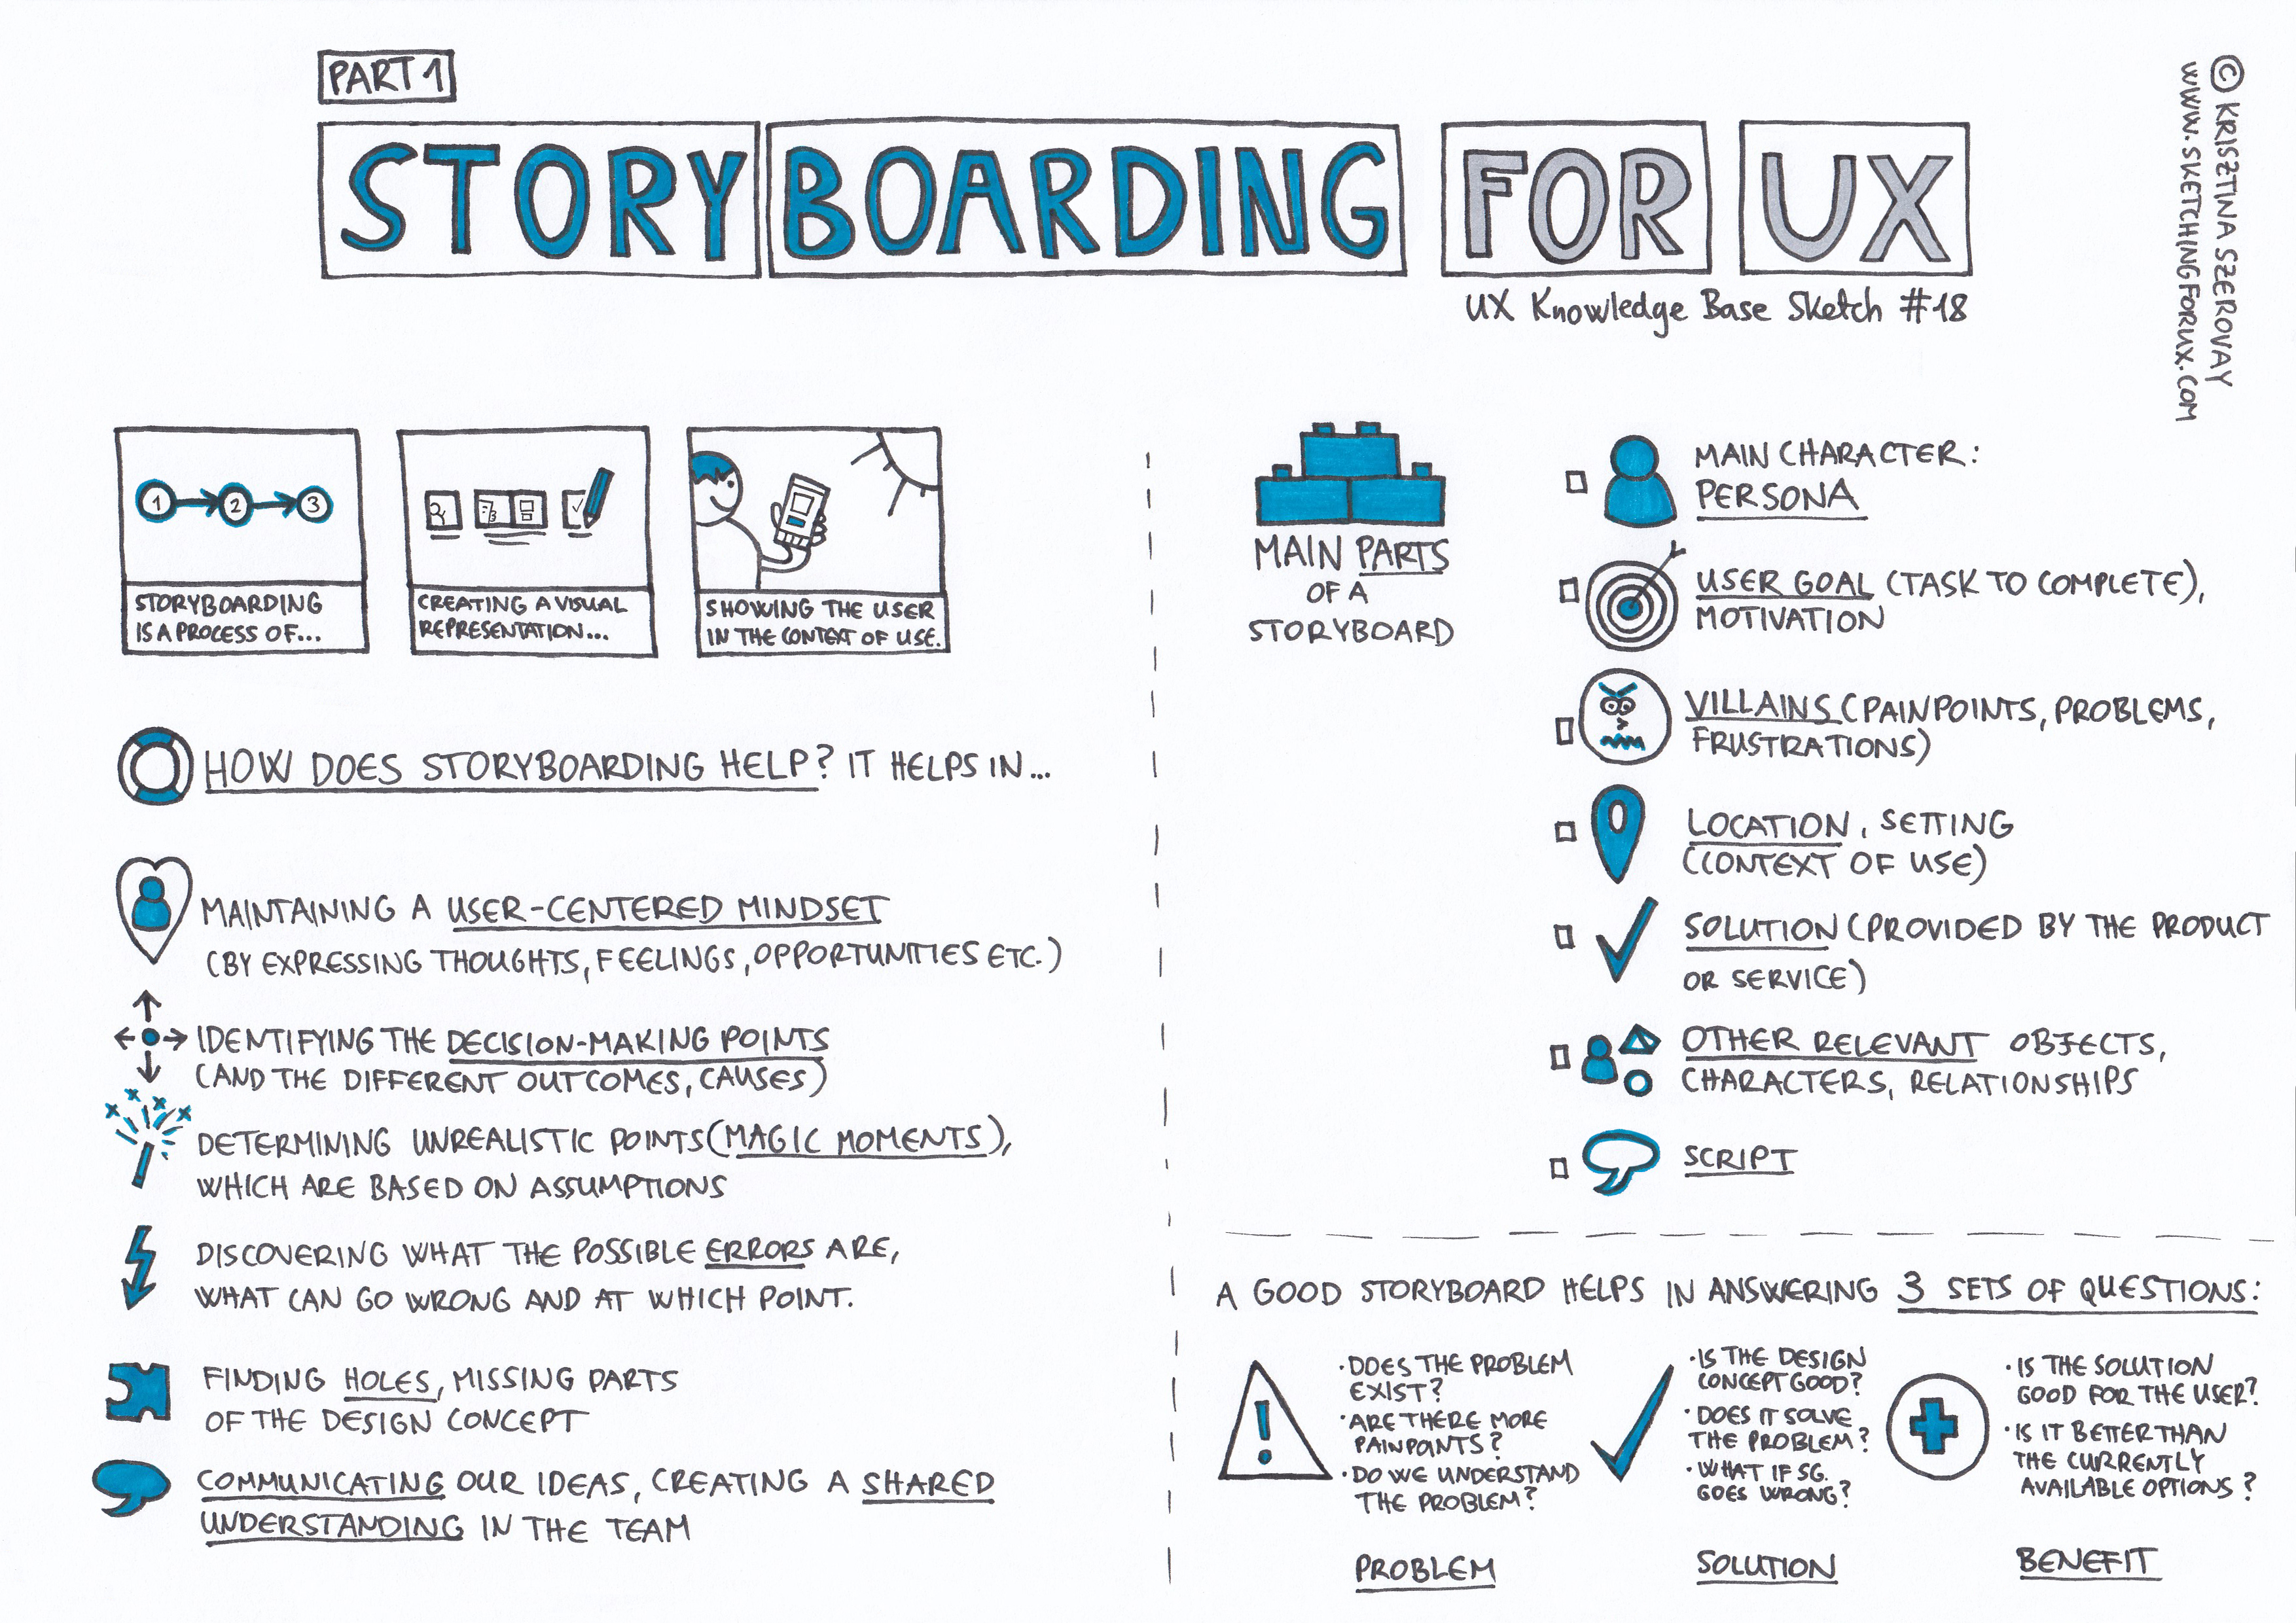
A storyboard is a series of images and captions that communicate an interaction: basically a comic. As detailed above, the process of making a storyboard also helps force you to specify how exactly you imagine the object to work, and what the experience of engaging with the object is like. I highly recommend making the storyboard as a group as it seeds a discussion of the details of the object.
More information about storyboards is available from the Nielsen Norman Group. My favorite storyboard pro-tip is to consider different levels of zoom when drawing the frames: use a wide zoom in a frame to establish the context of use, and a closer zoom to show details of the interaction.
On Canvas, please submit documentation of your general group brainstorm session (legible whiteboard photos are sufficient, or a Google Docs PDF) as well as your storyboard. If your team is torn between multiple ideas, feel free to submit multiple storyboards–this assignment is mainly for you to get some timely intermediate feedback from the instructor!
This milestone is graded on the bucket system as the focus is qualitative feedback. Make sure the object can be feasibly built in 1.5 weeks! Your group should get a ✓ as long as you submit a readable brainstorming session and coherent storyboard.
Resources
- I highly encourage using tools and materials at the Hive or HMC makerspace (make sure you’ve done the appropriate trainings for access to the space).
- If you want feedback on anything at all, or are unsure of how to implement an idea, or want a sanity check if something is feasible to do within the project timeline, please come to OH!
- For professional levels of speculative design objects, you can check out the Core 77 Design Awards for inspiration (and also browse through different years found on the top menu). Another example is the NUCA camera.
- The Disobedient Objects blog from the V&A Museum shows more objects in the museum exhibition our reading was from.
- This project was modified from the Protest Design provocation in UC Berkeley’s critical making course. (Scroll down about halfway through the webpage or search “protest design” to see the example objects student teams created in that course). Keep in mind, critical making is is a graduate level course with a heavier emphasis (and more students with prior backgrounds) in electronics design than our course. There is no need to have an Arduino in your object.
Final Grading & Submission
During class 5A (Feb 13), each group is going to give an 8 minute presentation communicating:
- Motivation and context for your design
- A brief demo of your object
- What questions you hope your object raises
- A little bit about the design process
- Playing the 2 minute max project video for the class
Each presentation will be followed by 6 minutes of Q&A.
By the end of day of class 5A (Feb 13), you should submit on Canvas a single PDF containing:
- Your project title
- A landscape single representative image of your project
- One paragraph (max ~200 words) describing your project
- A link to a short video (max 2 minutes) showing your project in use, in situ. This can be an unlisted (not private) YouTube video, but make sure I have permissions to access it (double check in an incognito tab)! This video can be in a TikTok style (you can even use TikTok’s editor to make it) or a traditional 16:9 aspect ratio video.
- Documentation of your design process. You may include your initial brainstorms and storyboards from the first milestone. Also document intermediate designs, sketches, etc. Write a few words explaining the material: take us through the journey of your project and help us understand the design decisions you make. (If you’re interested in professional UI/UX jobs, documentation of the design process of portfolio projects is often the first thing they look at when hiring.)
- A step-by-step documentation, Instructables style, of how to actually make your work, including a list of materials and tools required.
- Lastly, links to any code (like public Github repos), modeling files, or any other digital components incorporated in your work.
Finally, each group member should also complete a peer and self assessment form detailing their contributions to the project.
Rubric
- 5% completed milestone 1 on time
- 30% quality and originality of provocation and storytelling
- 30% execution of object design and interactivity
- 35% communicating the idea
- 15% in class presentation
- 10% PDF documentation
- 10% video
Everyone in the group should get the same grade, but these grades can potentially vary ~±5% based off of peer and self assessment.
Specific criteria
- 30% quality and originality of provocation and storytelling
- Did the team communicate who the intended users and use contexts of this object?
- Is the message behind the object clear and in protest?
- Does the object tell a story with depth, or is it a relatively flat takeaway? Could people with opposing views have a conversation around the object that lasts for a while?
- Does the object communicate culture and values?
- 30% execution of object design and interactivity
- (Look) Does the object look clean and polished and “professional”?
- (Feel) Is the way in which users interact with the object meaningful towards its protest goal?
- 35% communicating the idea
- 15% in class presentation
- Did the team communicate the points listed above for the presentation?
- Did the presentation stay under 8 minutes?
- Did everyone get an equal chance to speak?
- Did the team answer questions well?
- Did everyone on the team also ask thoughtful questions to other teams?
- 10% PDF documentation
- Does the process documentation communicate the points listed above and explain design decisions?
- Could someone replicate the project solely from reading the Instructables-style project documentation? Does it include materials and tools required?
- 10% video
- Does the video show the object being interacted with in the appropriate context of use?
- Does the video explain said context and larger motivation behind the project, basically narrating what’s going on?
- Is the video under 2 minutes?
- 15% in class presentation